The Admin area is visible only to users with the Admin access level. From here you manage portal users, upload and distribute your ISV settings files, review the audit trail, and configure identity-based licensing.
The four access levels — View, Manage, Edit, and Admin — form a hierarchy in which each level includes the abilities of the levels below it: View can see entities, Manage can edit existing entities, Edit can additionally create and delete servers and licenses, and Admin alone can reach the Admin area. For the authoritative description of each level and what it can do, see cloud-up-access-levels.
User Management
You manage portal users at Admin > Users. The page has two tabs:
System Users — your internal ISV users.
End Users — your customer accounts.
Each user row shows the following columns: Access (the user’s access level), Name, Email, Status, and Last Active. The Status column reads Pending, Active, or Disabled; a separate Locked chip appears when an account is currently locked out. A Search box and sort controls help you find users in a long list.
Creating a system user
From the System Users tab, press New User and enter the new user’s Email and an access level — one of View, Manage, Edit, or Admin. An invitation email is sent to that address. The invitation link is valid for 48 hours. The new user remains in Pending status until they accept the invitation and set their password.
For the invitation and account-setup flow as seen by the invited user, see Getting Started.
Creating an end user
From the End Users tab, press New User to open the Create new user form. The minimum needed for an end user is an email address; first name, last name, company, and contact information are optional. With just the minimum information entered, creating the user will not trigger an email to their email address and simply adds them as a user entity in the system.
The following fields provide additional functionality:
Company — Selecting a company will add the user as a contact. When viewing a company, all linked contacts will be displayed. This is both informational, as well as provides portal access to any servers assigned to that company (see below).
Allow portal access? — When this is toggled on, the user will have access to the end user portal where any servers assigned to their company, as well as their usage and logs, will be visible. End users have three access levels: View, Edit, and Admin.
Allow ID login? — Toggling this will add them as an ID licensing user and provide access to any assigned license servers
. .. attention:: When either portal access or ID licensing are enabled, clicking Create User
will trigger an email to the end user email to confirm their account and set a password.
Resending an invitation
If a pending user’s invitation expires or is lost, press Resend on that user’s row to send a fresh invitation. Resending issues a new 48-hour link and invalidates the previous one.
Editing a user
Editing a user lets you change the Contact associated with the user and the user’s access level. You cannot change your own access level. From the edit screen you can also trigger a password reset email to the user. User edits and password resets are recorded in the Audit Log.
Unlocking a user
When a user is locked out after repeated failed sign-in attempts, the lockout normally clears on its own after a short interval. To restore access immediately, press Unlock on the locked user’s row; this clears the lockout at once. For the lockout behavior as experienced by the user, see Getting Started.
General Settings
The Admin > General page is organized into tabs. The tabs an administrator uses are ISV, Audit Trail, Customization, and Identity & Access.
ISV
The ISV tab is where you upload the settings files that customize your license generation and your license servers. Two files are managed here:
Generator Settings file (
.gen) — used to generate your licenses.Server Settings file (
.set) — used by your license servers.
After you upload a file, it is distributed automatically to your license server machines.
Note
After a Server Settings (.set) file is uploaded and distributed, the servers
on all affected machines must be restarted before the new settings take effect.
The ISV tab also hosts Configure Failover, where you assign a failover machine to a primary machine. Failover is described in detail in Failover.
Customization
The Customization tab gathers two administrator settings:
Report Log Processing — the report-log retention period, described in Report Log Retention.
Custom Company fields — additional fields you can define on your company (customer) records. See Customers for how company records are used.
Audit Log
The Audit Log is a searchable record of administrative actions, found at Admin > General > Audit Trail. Each entry lists:
Action — the type of action performed.
User — the email address of the user who performed it.
IP Address — the address the action originated from.
Entity Type — the kind of record affected.
Entity ID — the identifier of the affected record.
Date / Time — when the action occurred.
You can filter the log by action type, by user email, and by a date range.
Audited actions include user updates and password resets, failover configuration changes, company, contact, and server deletions, debug-log deletions, checkout removals, and meter increments.
Note
Audit Log retention is configurable from 90 to 1825 days. Entries older than the configured retention period are pruned automatically.
Identity & Access
The Admin > General > Identity & Access tab configures identity-based licensing integration. It presents two cards, and each card shows when it was last updated.
JWT / OIDC
The JWT / OIDC card configures integration with a standard OIDC provider. Enter:
Audience
Issuer
OIDC Discovery URL — your provider’s
.well-known/openid-configurationendpoint.
The Audience and Issuer values must match the corresponding claims in the JWTs issued by your OIDC provider.
Azure
The Azure card enables the RLM Cloud Identity Licensing custom-claims extension for users authenticated via Microsoft Entra ID. Enter:
Azure Tenant ID
Azure App/Client ID
Both values are GUIDs.
For an overview of identity-based licensing in the portal, see ID Licensing.
Configuring Custom Claims extension in Microsoft Azure Entra ID
Before you begin
Required for our claims endpoint:
Your Tenant ID.
Your Client ID/Application ID that the custom claim was added to.
These 2 values allow us to configure the claims endpoint to accept requests from your Entra ID instance. Without them the endpoint will reject requests.
Setting up the Custom Claims Provider
Create a Custom Authentication Extension
Go to Azure Active Directory → External Identities → Self-service sign up → Custom authentication extensions
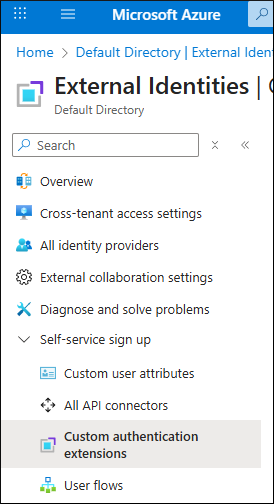
Click + Create a custom extension

Choose: TokenIssuanceStart

Next
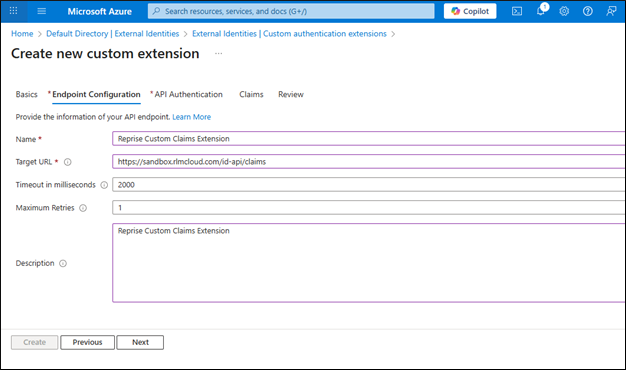
Fill in:
Name: e.g., Reprise Custom Claims Extension
Target URL: https://rlmcloud.com/id-api/claims
Timeout: Set as needed (default is fine)
Maximum Retries: 1 (default)
Description: Set as needed
Next
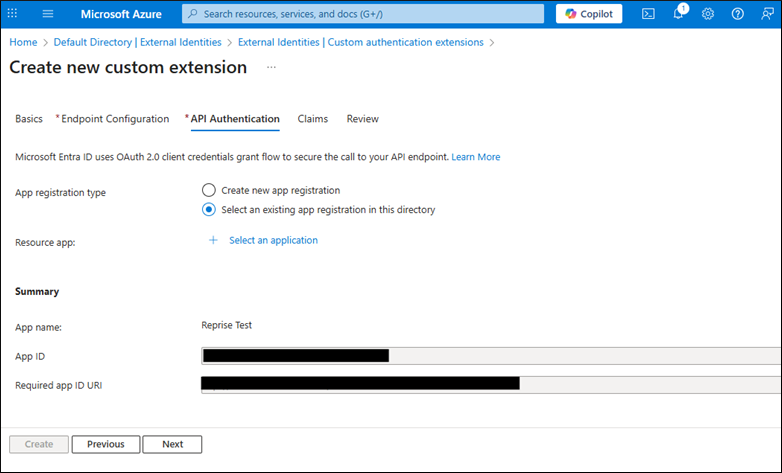
Choose “Create a new app registration” or “Select an existing app registration in this directory”
Ensure app has permission to receive custom authentication extension HTTP requests.
For internal testing we use a previously set up “Reprise SCIM Provisioning” Enterprise Application.
Next
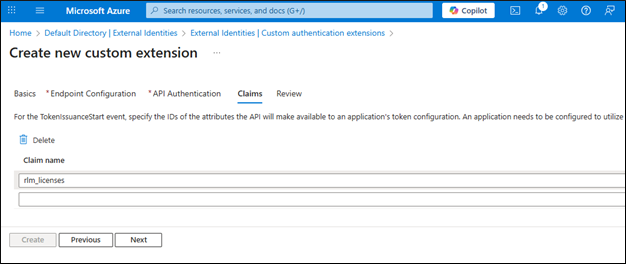
Add a new Claim name: “rlm_licenses”
This is what the claim will be labeled as that will contain the CUSTOMER licenses granted to the user. This must match what our endpoint returns.
Review and Create.
Assign the Extension to an Application
Go to Azure Active Directory → Enterprise Applications
Select the application you want to use the claims extension with.
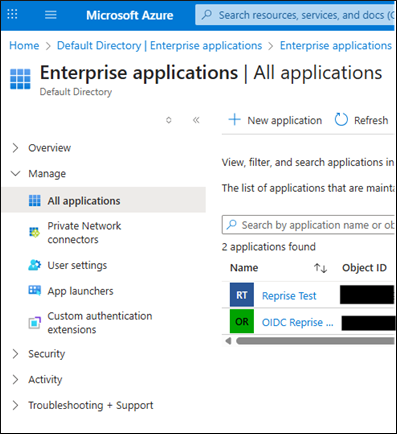
Go to Manage → Single Sign-On → Attributes & Claims
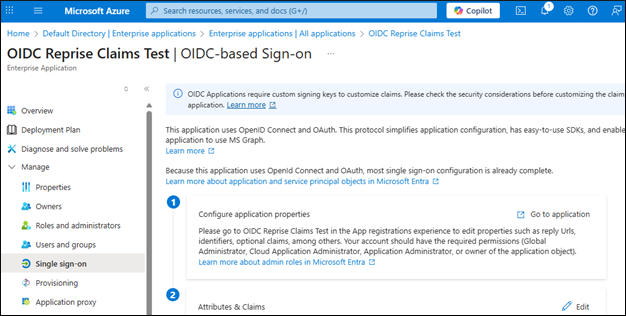

Click + Add new claim
Name: rlm_licenses
Source: Select Attribute
Source attribute: customclaimsprovider.rlm_licenses
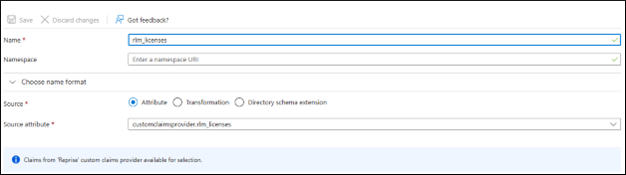
Save
You’re done!
Azure Entra ID will now call our claims endpoint and include your custom claims in tokens for assigned applications.
Test it out!
Once you have the claims extension set up and have a Reprise Identity Licensing user provisioned with a server attached you are ready to test. We can piece together an authorization request URL and redirect it to Microsoft’s JWT test website (https://jwt.ms) to view the contents!
https://login.microsoftonline.com/{Tenant-ID}/oauth2/v2.0/authorize?client_id={App_Client_ID}&response_type=id_token&redirect_uri=https://jwt.ms&scope=openid&state=12345&nonce=12345
If the account you authenticate with has an email value that matches an email provisioned in Reprise Identity Licensing feature, then a new custom claims value labeled “rlm_licenses” will be added to the token returned and will contain the CUSTOMER license lines entitled to that account.